Sunday, July 13, 2025

Chicken Yakhni Pulao (Pakistani Chicken and Rice)

Chicken Yakhni Pulao (Pakistani Chicken and Rice)

NY Times

Pakistan’s original meat and rice dish for special occasions, yakhni pulao is the demure rival to the more lavish, layered and spiced chicken biryani. Unlike biryani, yakhni pulao is delicately spiced and the rice is cooked in a quick yakhni (broth) made from the bone-in chicken pieces, which get added back to the rice toward the end of the cooking process. Golden sautéed onions give the pulao its distinct earthy color, while aromatic peppercorns, cumin, cloves and cinnamon flavor the rice. Green chiles provide a kick and yogurt a bit of sourness. Serve with a hefty curry like kaddu with greens and shrimp, butter paneer or Kerala-style vegetable korma, or alongside dal like masoor dal, sabut masoor dal or chana masala, or by itself.


Yield: 4 servings

1½ cups basmati rice 

1 pound bone-in, skinless chicken pieces (split breasts, thighs and/or legs)

8 to 10 black peppercorns 

4 to 6 cloves 

1 cinnamon stick 

2 teaspoons cumin seeds, divided

¼ cup ghee or neutral oil (such as canola or vegetable)

1 medium yellow or white onion, thinly sliced 

1 tablespoon ginger paste or freshly grated ginger 

1 tablespoon garlic paste or freshly grated garlic 

2 plum tomatoes, chopped 

2 Thai green chiles, stems removed

2 tablespoons Greek yogurt

Salt

1 teaspoon garam masala

2 tablespoons chopped cilantro


Place the rice in a large bowl and wash by soaking and draining a few times until the water runs clear. Fill up the bowl of rice with water one final time to soak the rice; set aside.

In a large heavy pot over high heat, combine the chicken, peppercorns, cloves, cinnamon, 1 teaspoon of the cumin seeds and 2½ cups water. When the water starts boiling, adjust heat to medium-low to maintain a simmer. Cover so the lid is ajar and cook 20 minutes. Transfer the chicken and broth to a large bowl and set aside.

Add ghee to the now-empty pot and heat on high for 45 seconds. Stir in the remaining 1 teaspoon cumin seeds. Add onion, ginger and garlic, and continue to cook, stirring occasionally until onion is golden, 7 to 10 minutes. Return the chicken pieces to the pot. Continue cooking on high until the chicken has darkened slightly, about 5 minutes. Stir in tomatoes, green chiles and yogurt.

Drain the rice and stir it into the pot along with 2½ cups of the reserved broth (along with any spices in the broth). Season with salt. Bring to a boil, then adjust heat to medium-low to maintain a simmer.

Wrap a kitchen towel around the lid of the pot so it’s covered from all sides (this ensures a seal and locks in moisture). Cover the pot with the wrapped lid. Continue cooking over medium-low, undisturbed, for 12 minutes. Turn off the heat and let the pulao rest for 10 minutes.

Remove the lid and fluff the pulao. Sprinkle with garam masala and cilantro and serve.


Summer Roll Noodle Salad

Summer Roll Noodle Salad

NY Times 

Taking a cue from Vietnamese summer rolls, this rice vermicelli noodle salad is packed with the bold, bright flavors and textures reminiscent of its namesake dish. With tender lettuce for its sweet, earthiness (and a nod to the lettuce often used to wrap around spring rolls), a hefty handful of fresh herbs and plump shrimp, this salad is texturally rich and full of fresh flavors.  The dressing — a hybrid of peanut dipping sauce and nước chấm — is nutty, punchy and deeply savory thanks to the fish sauce and hoisin. To lessen the fiery bite of the Thai chile in the dressing, let it sit in the lime juice before adding the rest of the ingredients.  A combination of carrots and bean sprouts bulk up the salad, but feel free to swap more of one for the other.


Yield: 4 to 6 servings

For the Salad

4 ounces rice vermicelli noodles

1 pound peeled and deveined large shrimp, tails on or off (thawed if frozen)

Kosher salt and freshly ground black pepper 

1 tablespoon canola or vegetable oil

1½ cups tightly packed mixed herb leaves (such as cilantro, mint and Thai basil), torn if large

⅔ cup roasted and salted peanuts, chopped or crushed

1 ½cups shredded carrots (about 4½ ounces, from about 3 medium carrots)

1 cup bean sprouts (about 3½ ounces)

2 handfuls (about 2 ounces) tender baby lettuce leaves (such as red leaf, green leaf, butter or a combination)

For the Dressing

1 Thai chile, thinly sliced (seeded for a milder dressing) 

2 to 3 large limes 

¾ cup smooth peanut butter

2 tablespoons hoisin sauce

1 tablespoon freshly grated garlic, from 3 large cloves

1 tablespoon freshly grated ginger, from a 1½-inch piece

1 tablespoon sugar

1 tablespoon canola or vegetable oil

1 tablespoon fish sauce

Cook the rice vermicelli noodles according to package instructions. Immediately transfer to a colander and rinse under cold water. Set aside to drain well.

While the noodles cook, make the dressing. Place the sliced chile in a large bowl. Zest the limes until you have 1 teaspoon zest and add to the bowl. Juice the limes over the chile (about ½ cup juice) and let sit for 5 minutes. Add the peanut butter, hoisin sauce, garlic, ginger, sugar, oil and fish sauce and whisk to combine. Whisk in 2 tablespoons warm water to loosen (if the dressing is still too thick, add a touch more lime juice.) Reserve ½ cup of the dressing for drizzling.

Season the shrimp lightly with salt and pepper. In a large (preferably nonstick) skillet, heat the oil over medium-high until shimmering, about 1½ minutes. Arrange the shrimp in a single layer and cook, undisturbed, until just opaque, 3 to 4 minutes. Flip and continue to cook until just fully cooked, 1 to 2 minutes more. Transfer the shrimp to a large plate to prevent overcooking.

Add the noodles, half the herbs, and half the peanuts to the bowl with the dressing and toss until the noodles are well coated. Top with the carrots, bean sprouts, lettuce and shrimp. Spoon the remaining dressing over the vegetables and shrimp and top with the remaining herbs and peanuts.


Tip: The dressing can be made up to 3 days in advance and stored in the refrigerator. Bring to room temperature before using by letting sit on the counter or briefly heating in the microwave.


Soondubu Jigae - Tofu stew

 This is Seonkyoung Longests recipe.

INGREDIENTS:

2 tbsp sesame oil

2 tbsp gochugaru, Korean red pepper flakes

3 cloves garlic, chopped

1 large spring onion or 2 green onions, chopped divide white to light greens and dark greens

1/2 cup kimchi, chopped

1 1/4 cup water

1 tbsp Korean soup soy sauce or light soy sauce (light in color, not in sodium)

1 tbsp Thai fish sauce

6 oz seafood mix (Any seafood will work for this recipe or one kind) or pork belly or beef

14 oz silken tofu

1 egg

Easy and fairly loose directions from Seonkyoung Longest.

On med heat put sesame oil, gochugaru, garlic and white part of onions til translucent, add pork or beef if you’re using.

Then add your kimchi, water, soup soy sauce or soy sauce, fish sauce, bring to simmer, add your seafood if using, lightly spoon out tofu into pot and continue on medium simmer.

At 2-3 mins before ready to serve then you crack egg on the middle and simmer til the egg is to your liking. Sprinkle green onions on top.

*Another recipe.

Ingredients 2 portions

cooking oil

100g thinly sliced pork belly

1 onion, chopped into bite sized pieces

4 cloves of garlic, minced

0,5 cups kimchi, chopped into bite sized pieces

1,5 - 2 cups anchovy stock made from dried anchovies, kelp and radish

2-4 tbsp gochugaru

2 tbsp kimchi juice

2 tsp sesame oil

1 green chili, sliced on the diagonal

400-500g soondubu (soft tofu)

2 eggs

2 spring onions, finely chopped

Instructions

Heat a bit of oil in your earthenware pot (or in a dutch oven).

Add pork and stir fry for a couple of minutes. Add onion and garlic and fry until the onion is translucent and brown around the edges. Add kimchi and again stir fry for a couple of minutes until the kimchi starts to caramelise.

Add the anchovy stock and kimchi juice and boil until the pork is tender; around 10 minutes.

Mix the gochugaru with the sesame oil and add that, the green chili and the tofu to the pot.

Add the eggs and let cook for a minute or so until it starts to firm up slightly.

Add chopped spring onions and serve.

If your kimchi isn’t very sour yet also add in a tbsp or two of rice vinegar. You may also need to add some salt depending on the saltiness of your kimchi and your anchovy stock.


Summer Shrimp Scampi With Tomatoes and Corn

Summer Shrimp Scampi With Tomatoes and Corn

Shrimp get along well with garlic, butter and lemon, and so do tomatoes and corn. Combine them, and you get a summery shrimp scampi that comes together in one skillet. A searing hot pan helps the tomatoes blister and the corn caramelize before they are coated in a garlic-lemon butter sauce. This is a meal in and of itself, but if you want to serve it with pasta or bread, they’d be welcome additions.


Yield: 4 servings

1 pound large shrimp, peeled and deveined

Kosher salt and black pepper

2 tablespoons extra-virgin olive oil

1 pint cherry or grape tomatoes

2 cups fresh or frozen corn kernels (from 4 ears)

5 garlic cloves, minced

½ teaspoon red-pepper flakes

¼ cup dry white wine

2 tablespoons fresh lemon juice (from 1 lemon), plus wedges for serving (optional)

5 tablespoons unsalted butter, cut into 5 pieces

3 tablespoons chopped parsley or chives, or torn basil leaves

Pat the shrimp very dry and season with salt and pepper. In a large (12-inch) skillet, heat the olive oil over medium-high. Add the shrimp and cook until pink and lightly golden in spots, 1 to 2 minutes per side. Use a slotted spoon to transfer the shrimp to a plate.

Add the tomatoes to the skillet, season with salt and pepper, and cook, stirring just once or twice, until they start to blister in spots, 3 to 4 minutes. Add the corn, season with salt and pepper, and cook, stirring just once or twice, until the tomatoes burst and the corn is golden in spots, 3 to 4 minutes.

Add the garlic and red-pepper flakes and cook, stirring, until you smell garlic, about 1 minute.

Reduce heat to medium, and add the wine and lemon juice, scraping any brown bits from the bottom of the pan. Cook until nearly evaporated, then add the butter and stir until melted. Add the shrimp and its juices and stir until warmed through. (If the sauce breaks and looks greasy, add 1 or 2 teaspoons of water and stir until emulsified.)

Remove from heat, add the herbs, season to taste with salt and pepper, and serve with extra lemon for squeezing over, if you like.

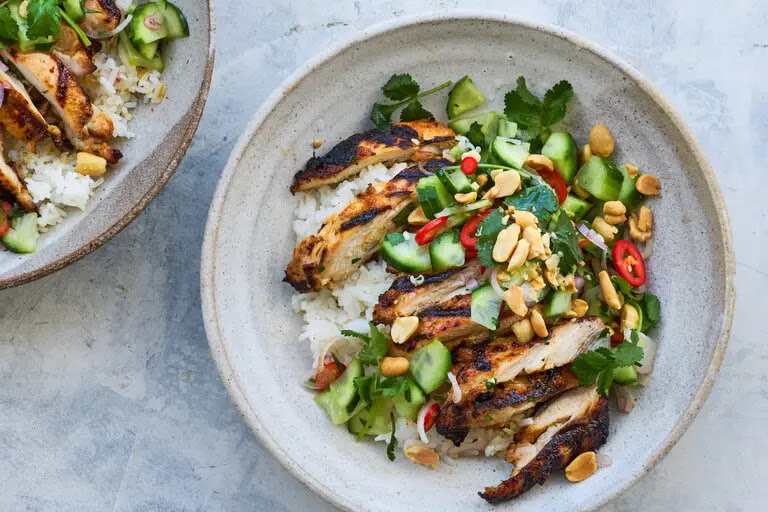
Satay-Style Grilled Chicken Thighs

Satay-Style Grilled Chicken Thighs

A familiar sight on many Thai menus in the U.S., chicken satay typically involves grilled skewers of marinated chicken, charred and stained with spices, and served with peanut sauce and perhaps a cucumber relish on the side. This recipe gives the dish a one-plate remix by bringing all the same flavors together, in slightly different proportions, and placing them atop rice. Because of its sugar and fat content, the coconut milk in the chicken marinade chars up beautifully on the grill, while the chile in the cucumber relish — served as an abundant garnish here — balances out the sweetness of the dressing. Replacing the traditional peanut sauce, chopped peanuts add pops of crunch. Get ahead by putting together the salad and marinade the day before and storing them in the fridge until you’re ready to make the chicken.


Yield: 6 servings

For the Marinade and Chicken

½ cup unsweetened coconut milk

2 tablespoons fish sauce

2 tablespoons seasoned rice vinegar

2 tablespoons Thai red curry paste

1 tablespoon brown sugar

1 teaspoon yellow curry powder (any kind)

2 pounds boneless, skinless chicken thighs (6 large thighs)

For the Cucumber Salad

4 mini cucumbers, quartered lengthwise and thinly sliced

1 medium shallot, halved and thinly sliced

¼ cup seasoned rice vinegar

1 tablespoon fish sauce

1 fresh Fresno, cayenne or serrano chile, thinly sliced

3 tablespoons chopped cilantro

Cooked jasmine rice, for serving

⅓ cup roasted unsalted peanuts, chopped


Make the marinade: In a medium bowl, whisk together the coconut milk, fish sauce, vinegar, curry paste, brown sugar and curry powder. Transfer ⅔ cup of the marinade to a gallon-size resealable zip-top bag, along with the chicken. (Set aside the remaining marinade.)

Seal the bag, pushing out any excess air. Toss to coat the chicken. Place in a dish and refrigerate for at least 2 hours or up to 8 hours.

Meanwhile, prepare the cucumber salad: In a small bowl, combine the cucumbers, shallot, vinegar, fish sauce and chile. Refrigerate until ready to serve, up to 24 hours.

Heat a grill to medium-high. Remove chicken from the marinade and pat dry with paper towels. Discard marinade in bag.

Place chicken on the hot grill grate. Cover and grill for 5 minutes per side. Brush tops of chicken with reserved marinade. Continue grilling, turning, and brushing on marinade until chicken is cooked through, 4 to 6 minutes more.

Thinly slice the chicken and serve atop the rice. Stir the cilantro into the cucumber salad, then spoon the salad and its dressing over the chicken. Garnish with the peanuts.

Sunday, July 6, 2025

Salmon With Lemon-Herb Marinade

Salmon With Lemon-Herb Marinade

NY Times


Yield:

6 servings

13-pound salmon fillet, in one piece

1clove garlic, minced

2tablespoons dark brown sugar

2tablespoons soy sauce

1tablespoon grated lemon peel

2tablespoons parsley, chopped fine

2tablespoons fresh thyme leaves

1tablespoon fresh rosemary leaves

Juice of ½ lemon

2tablespoons sesame oil

¼cup extra-virgin olive oil

Coarse salt and freshly ground pepper to taste

1lemon, cut into 6 wedges

Sprigs of rosemary, for garnish


Wipe salmon fillet dry with paper towels. Combine remaining ingredients (except lemon wedges and rosemary sprigs) in small bowl and mix well. Pour mixture over salmon, making sure it is coated on both sides. Marinate for at least an hour before cooking.

Preheat broiler or grill. Cook salmon, turning once — five to six minutes each side for medium rare.

Place salmon on serving platter and garnish with lemon wedges and sprigs of rosemary.


Tuesday, July 1, 2025

Strawberry Matcha Latte

Strawberry Matcha Latte

NY Times 


This colorful, easy-to-make drink — popularized by various bubble-tea chains and trending on TikTok in the spring of 2023 — combines matcha, a powdered green tea traditionally consumed in parts of East Asia, with strawberries, a beloved summer fruit. Served over ice, with distinct layering, the delightful balance of macerated fresh strawberries on the bottom, your choice of milk in the center and earthy matcha on the top creates a vibrant and harmonious flavor combination.

For those not used to making matcha lattes: (i) use a high quality matcha drinking powder not a "cooking" powder; (i) buy a chasen to thoroughly mix matcha with water, works better than whisks; (iii) matcha quantity should be 1 1/2 TSP PER SERVING (total of 6 TSP); (iv) water should be hot when mixing matcha, otherwise it will not blend well; and (v) to cool it, make milk ice cubes and drop them into the hot matcha, stirring, otherwise you will water down the matcha too much. Fabulous recipe!

*I think the recipe works better in equal thirds. Not enough matcha as written, in my opinion. The matcha makes the drink. Otherwise, it’s just a lot of milk and strawberries.

4 servings

8ounces fresh strawberries, hulled and finely chopped

4 to 4½teaspoons granulated sugar (depending on the sweetness of your strawberries)

1teaspoon powdered matcha

4 to 6cups milk (dairy or non-dairy)

Ice, for serving


Add strawberries and sugar to a medium bowl. Using a muddler, potato masher or fork, mash and thoroughly combine them. (If you want a smoother latte, pulse strawberries and sugar in a blender.) Set aside.

Prepare the matcha per package instructions, using ½ cup of room temperature water and mixing until combined. There should be no visible lumps of matcha powder.

Divide strawberry mixture among 4 tall glasses, then fill halfway with ice. Carefully pour 1 to 1½ cups of milk into each glass over the ice and strawberries. Then top each serving with about 2 tablespoons of the matcha mixture. You should see 3 distinct colors.

Stir to combine before drinking. The drink is best consumed through a wide straw.

Pepperoncini Tuna Salad

Pepperoncini Tuna Salad

NY Times - Eric Kim


This verdant tuna salad looks and tastes classic (but with the saturation levels all the way up). Acid and crunch come in the form of delightfully sour, salty pickled pepperoncini and their neon-green brine. Sweet relish anchors the salad with balance, as does deeply aromatic and nutty toasted sesame oil. Any canned or jarred tuna works; just be sure to drain it very well. This recipe calls for celery to be folded in at the end for crunch, but any vegetable would work: thinly sliced cucumbers, iceberg lettuce, watercress, green peas, asparagus, even raw onion. Eat this on a bed of peppery arugula or stuffed into a split, just-warmed croissant or brioche bun.

Yield: 2 servings

2 (5-ounce) cans tuna (preferably stored in oil), very well drained

¼ cup mild-tasting mayonnaise, such as Hellmann’s

3 tablespoons chopped pepperoncini plus 1 tablespoon brine, plus more of each to taste

1 tablespoon sweet pickle relish

1 tablespoon toasted sesame oil

½ garlic clove, finely grated

Salt and freshly ground black pepper

1 cup thinly sliced celery (from 2 stalks)

Croissants (optional), split, for serving


In a medium bowl, combine the tuna, mayonnaise, pepperoncini and its brine, sweet relish, sesame oil and garlic. Season with salt and pepper.

Stir vigorously with a fork, breaking up the tuna into fine threads. Fold in the celery, then taste and add more salt, pepper, pepperoncini and pepperoncini brine to your taste. Stuff into croissants for sandwiches, if you’d like.

Tzatziki Chickpea Salad

Tzatziki Chickpea Salad

NY Times Hetty Lui McKinnon


Vibrant with the sharp creaminess of tzatziki, the Greek yogurt dip, this dish embodies the cool, easy eating of the warmer months. Crisp cucumbers and hearty chickpeas are dressed with a lemony and garlicky Greek yogurt mixture. A hint of honey brings harmony to the dressing; the hum of sweetness softens the tartness of the yogurt and introduces a richness to the dish. This no-cook salad is hearty enough for a standalone meal, but should you wish to dress it up, here are a few serving suggestions: Eat with flatbread, falafel, veggie skewers, or roasted Greek lemon potatoes.

Yield: 4 servings

1 cup Greek yogurt

1 garlic clove, grated

2 tablespoons olive oil, plus more for serving

2 teaspoons honey

1 lemon, halved (or more, if desired, for seasoning)

Salt and pepper

1 pound Persian cucumbers, halved lengthwise and cut into ½-inch pieces

2 (15-ounce) cans chickpeas, drained

Big handful dill, chopped

Big handful mint leaves, chopped

2 scallions, thinly sliced

To a large bowl, add the yogurt, garlic, olive oil, honey and the juice of ½ lemon; whisk to combine. If it seems too thick, loosen it up with a splash of water or more lemon juice. Season well with salt and pepper.

To the yogurt, add the cucumbers, chickpeas, dill, mint and scallions, and squeeze the remaining ½ lemon over the mixture. Toss to coat. Taste and season well with salt and pepper.

To serve, drizzle with additional olive oil.


Saturday, June 28, 2025

Cream Cheese Brownies

Cream Cheese Brownies

NY Times 


What’s better than rich and fudgy cocoa brownies? Decadent brownies with a layer of creamy cheesecake swirled throughout. When making the cheesecake layer, the cream cheese should be just soft enough to incorporate with the other ingredients easily but not super soft. If it is too warm, the cheesecake batter will be too runny and will flow over the top of the brownies. Instead of creating a swirl, you’ll have two layers. If you want to take these brownies to another level, dollop a bit of your favorite jam or preserves on top of the cream cheese batter before swirling everything together.

Yield: 16 servings

For the Cream Cheese Batter

8 ounces cream cheese, softened

1 large egg

¼ cup/31 grams powdered sugar

1 tablespoon all-purpose flour

1 teaspoon pure vanilla extract

For the Cocoa Batter

10 tablespoons/141 grams unsalted butter, plus more for the pan

1 cup/200 grams granulated sugar

⅓ cup/50 grams semisweet chocolate chips

2 large eggs

1½ teaspoons vanilla extract

¾ cup/96 grams all-purpose flour

¾ cup/71 grams unsweetened cocoa powder (Dutch-processed or natural)

½ teaspoon baking powder

¾t easpoon kosher salt (such as Diamond Crystal)


Heat the oven to 350 degrees. Butter and line an 8-inch square baking pan with parchment paper, leaving a 2-inch overhang on 2 sides to make a sling. Lightly butter the parchment.

Make the cream cheese batter: In a medium bowl, beat together the cream cheese, egg, powdered sugar, flour and vanilla until well combined.

Prepare the cocoa batter: In a medium saucepan over medium heat, combine the butter and sugar. Cook, stirring, until the butter is melted, then remove the pot from the heat. Whisk vigorously until the mixture is homogenous and opaque and the sugar has dissolved, about 4 minutes. Add the chocolate and let stand 1 minute. Whisk to combine.

Add the eggs and vanilla and whisk until smooth. Add the flour, cocoa powder, baking powder and salt and stir to combine. Transfer about two-thirds of the cocoa batter to the prepared pan and spread in an even layer.

Spread the cream cheese batter evenly over the cocoa batter, then dollop the remaining one-third of the cocoa batter over the cream cheese layer. Using a butter knife, swirl the batters together in a decorative pattern.

Bake until the brownies are set and a toothpick inserted in the center comes out with moist crumbs attached, 24 to 28 minutes. Transfer the pan to a rack to cool completely.

To serve, use the parchment overhang to lift the brownie out of the pan and transfer to a cutting board. Cut into squares. Store in an airtight container at room temperature for up to 3 days.


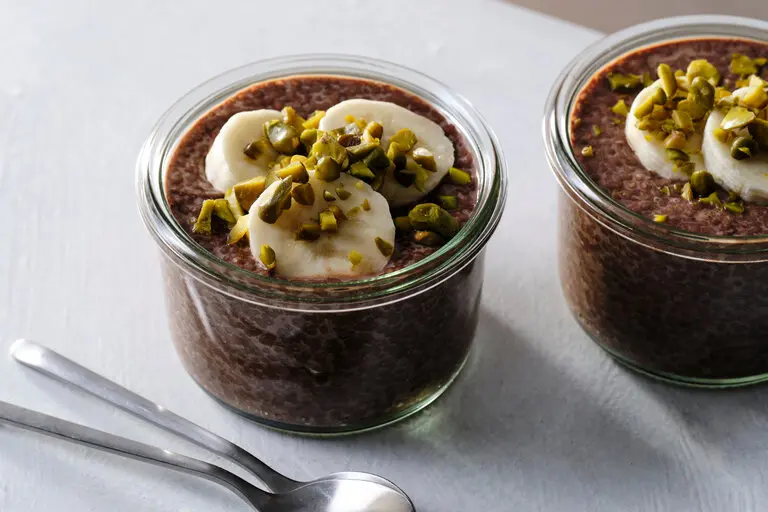
Chocolate Chia Pudding

Chocolate Chia Pudding

NY Times 


Ideal for a quick, grab-and-go breakfast or snack, chocolate chia pudding is a nutritional powerhouse that takes minimal effort to prepare. Flavored with cocoa powder and warming spices like cinnamon, cardamon and a pinch of nutmeg, this cooling pudding can be prepared with your milk of choice, no cooking required. It does need an overnight rest in the refrigerator to set: For the best texture, stir the pudding mixture together in the evening for breakfast or a snack the next day. The longer the pudding rests, the more the chia seeds will expand and absorb the liquid. Add a splash of milk to thin out to desired consistency when serving, and top with any combination of fruits, nuts and granola.

Yield: 6 servings

¼ cup cocoa powder or raw cacao powder

2 cups milk or milk alternative of choice, such as oat or almond 

½ cup black or white chia seeds 

¼ cup maple syrup (or sweetener of choice, to taste)

1 teaspoon vanilla extract

½ teaspoon ground cinnamon

¼ teaspoon ground cardamom (optional)

A tiny pinch of ground nutmeg (optional)

Any combination of toppings, such as berries, banana slices, chopped stone fruit, chopped nuts, granola or coconut flakes, for serving

In a large bowl, whisk the cocoa powder to break up any clumps. Add the milk and whisk to combine. Add the chia seeds, maple syrup, vanilla extract and cinnamon, along with the cardamom and nutmeg (if using), and whisk to combine. The mixture will be loose at this point, but will firm up as it chills. (To make single-serving puddings, you can divide the chia mixture among smaller containers or glasses.)

Cover and refrigerate overnight, or for 8 hours. Stir before serving, garnish with preferred toppings and serve. (Chia pudding will keep, covered, in the refrigerator for up to 5 days. It will thicken the longer it sits, but can be loosened with a splash of milk.)


Corn Casserole

Corn Casserole Here is a from-scratch version of the classic corn casserole, a popular holiday side dish in the southeastern United States t...