Wednesday, September 28, 2022

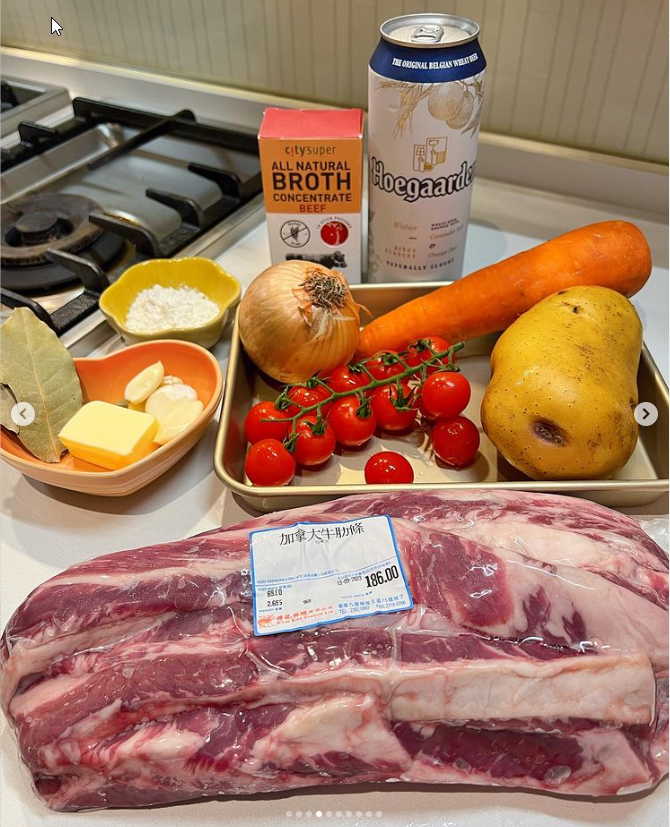
啤酒炆牛肋條 𝐵𝑒𝑒𝓇 𝐵𝑒𝑒𝒻

 啤酒炆牛肋條🍺 𝐵𝑒𝑒𝓇 𝐵𝑒𝑒𝒻


👶🏻分開煮咗個小朋友version! 主要分別就係無用啤酒,用水取代❣️佢勁鐘意用來撈飯!😗

▶️煮肉既啤酒想更好食可選用黑啤如Stout, Porter 或 Dark ale. 不過我屋企有罐普通light啤酒,同樣好味,高溫煮過後無酒精味,但留有特別的麥香味

▶️因為加入了麵粉去令到個汁濃厚,一定要用小火炆,期間要不時觀察留意,太大火會好易煮乾,牛湯我用citysuper一隻濃縮精華,味道天然好用 (材料圖紅色個包)

材料:

牛肋條 400-500g

洋蔥 一小個或半大個

車厘茄 8粒

蒜頭 3粒

甘荀 1條

薯仔 1-2小個

茄膏 2湯匙

牛油 2湯匙

啤酒 300ml

牛湯 300ml

麵粉 2湯匙

Bay Leaf 2片

糖 1湯匙

黑椒和鹽 適量


做法:

1) 牛肋條解凍後切成塊,加鹽和黑椒醃十分鐘,洋蔥切條,車厘茄切半,甘荀和薯仔切塊

2) 熱鍋下油,加入牛肋條用中火煎至2邊微微金黃,盛起備用

3) 同一個鍋中,(如太多油可倒一倒,不用洗) 用牛油細火炒香洋蔥,再加入蒜頭炒香,再加入車厘茄、甘荀和薯仔炒勻

4) 加入茄膏炒勻,再下麵粉拌勻,加入牛肋條,倒入牛湯、啤酒和Bay Leaf,大火煮滾後加入糖、鹽和黑椒,轉小火蓋上蓋炆1.5-2小時即可


Yummy beef beer stew

Ingredients:

Beef rib fingers 400-500g

Onion 1/2

Cherry tomato 8

Garlic 3cloves

Carrot 1

Potato 1 large

Tomato paste 2tbsp

Butter 2tbsp

Beer 300ml

Beef stock 300ml

Flour 2tbsp

Bay Leaf 2pieces

Sugar 1tbsp

Black pepper & salt to taste


How to:

1) Add black pepper and salt into beef, set aside for 10 mins, pan fry with oil until both side turn light golden brown, set aside

2) Peel and chop carrot, potato and onion

3) In the same pot, add butter, pan fry the garlic and onion for 3mins, then add in cherry tomato, carrot and potato!

4) add tomato paste, mix well, add flour, mix well, then add in beef, beef stock, beef and bay leaf. Bring to boil with high heat, add in sugar, salt and black pepper. Cover the lid and cook for 1.5-2 hours with low heat.


*Adding flour is for a thicken sauce, but please be mindful to boil with low heat, stir and monitor frequently to avoid the bottom got burnt*

Wednesday, September 21, 2022

Good lip stains/tints for light, cool toned skin

Romand: FigFig, Thulian, Taffy, Cherry Bomb, Berry Divine, Cherry Way, Bare Grape, Mauvish, Rosienthal, Currant Jam, Petal Tassel, Nerd Pink

Peripera: Pink Youth, Cherry So What, Plum Update, Rosy Nude, Mauveful Nude, Goji Berry, Star Plum Pink, Classy Plum Rose, Love Sniper Red

Etude House: Dusty Beige, Cranberry Plum, Evening Mauve

WakeMake: Favorite, Pinky Ice, Tender Mauve, Festive Plum

Clio: Afterlight Pink, Mauve Plum

3CE: Double Wind, Early Hour, Spot Player

Hince: Allurement, Unchanted, New Perspective

Amuse: Flower Market, Berry Velvet

And there's a lot more in Korean makeup as cool toned shades have been popular! Key words to look out for in the shade names are: Cool, Berry, Mauve, Cherry, Plum, Grape, Rose, Pink, etc as the brands tend to recycle those words to describe cool colors. Some shades may be slightly warmer than others. It also depends on if you're neutral cool or a true cool as well as your natural lip color. Also check out other Korean brands such as Merzy, Laka, Mude, Colorgram, etc!

Pad Krapow Gai (Thai Basil Chicken)

 Yield: 2 to 4 servings

¼ cup vegetable oil

1 pound ground chicken (preferably dark meat)

2 teaspoons minced garlic (from 2 cloves)

2 teaspoons granulated sugar

1 teaspoon minced fresh bird’s-eye chile or other fresh chile (from 1 chile)

8 ounces green beans, trimmed and cut into ½-inch pieces (about 1½ cups)

3 tablespoons oyster sauce

2 tablespoons fish sauce

1 tablespoon Thai seasoning sauce (such as Golden Mountain; see Tip)

1 cup loosely packed basil leaves (preferably Thai basil or holy basil)

Ground white pepper, to taste

Steamed jasmine rice, for serving

4 crispy fried eggs (optional)

Step 1

Heat a wok or large nonstick skillet over medium-high, then swirl in the oil. Once the oil is shimmering, add the ground chicken and cook, actively breaking the chicken up into small pieces, until it is mostly cooked, about 6 minutes.

Step 2

Stir in the garlic, sugar and chile until evenly distributed and fragrant, about 2 minutes, then add the green beans, oyster sauce, fish sauce and Thai seasoning, and cook, stirring constantly, until the chicken is fully cooked, the green beans are crisp-tender and the krapow is glossy, about 2 minutes.

Step 3

Remove from heat, add the basil and a dash of white pepper and toss to combine. If the sauce seems to cling too tightly to the mixture, add 1 to 2 tablespoons of water to make it loose and glossy.

Step 4

Serve over rice, and top with a crispy fried egg, if desired. Serve with additional Thai seasoning to sprinkle on top, according to taste.

Tip

Golden Mountain is made with fermented soybeans, like soy sauce, and imparts sweetness along with its jolt of salinity. It can be purchased in Asian supermarkets or online and lasts indefinitely. A dash of it adds complexity to stir-fries, curries, fried rice and cooked proteins and vegetables.


Wednesday, September 14, 2022

Picanha in oven - beef


Picanha. All hail The Queen. start off low and slow @ 225F in oven, let the Picanha come to temp(125F), pull out and rest, then crank oven up @ 500F, blast for 5-10 minutes. You should get that medium rare, edge to edge.

Monday, September 12, 2022

Sheet Pan Chow Mein

 Sheet Pan Chow Mein - Hetty McKinnon

Serves 4

Ingredients:

1 bell pepper (any color), finely sliced

1 carrot, peeled and finely sliced diagonally

1 broccoli head, cut into florets

1 tablespoon toasted sesame oil

Extra-virgin olive oil

9 ounces (255g) dried thin egg noodles

1 can (8.8 ounce/250g) cut baby corn, drained

5 ounces (140g) asparagus, woody ends trimmed, cut into 2-inch (5cm) pieces

1 scallion, finely sliced

Handful of cilantro leaves

2 tablespoons toasted white sesame seeds

Sea salt

Soy seasoning:

1 tablespoon toasted sesame oil

1/4 cup (60ml) soy sauce, tamari or coconut aminos

1 tablespoon vegetarian stir-fry sauce

1/4 teaspoon white pepper

1 small garlic clove, grated

Substitute:

Broccoli: Asian greens

Asparagus: sugar snap peas or snow peas

Vegetarian stir-fry sauce: omit if unavailable

Egg noodles: ramen noodles

Veganize:

Use wheat noodles

Cantonese chow mein is well known for its contrasting textures – crispy fried strands tangled with soft noodles, tender-crisp veggies, all smothered in an umami-rich sauce. While the wok is still the traditional (and arguably the best) cooking vessel for chow mein, a humble sheet pan is also a handy way to rustle it up with minimal effort. Simply throw everything on a sheet pan and let the oven do the work for you. It’s also a great way to use up leftover vegetables or seasonal produce. Dried (or fresh) thin egg noodles are generally best for chow mein, as they crisp up nicely, but if you’re less concerned about crispiness, use whatever noodles you have on hand. 

Preheat the oven to 400°F (200°C).

Place the bell pepper, carrot and broccoli on a half sheet pan (about 13 x 18 inches / 32.5 x 45cm), drizzle with the sesame oil and a splash of olive oil and season with sea salt. Toss to coat in the oil, then bake for 10 minutes until the vegetables are starting to soften.

Meanwhile, bring a large saucepan of salted water to the boil. Add the egg noodles, and cook according to the packet instructions until al dente, about 4-5 minutes. Drain and cool under cold running water. Drain well again and pat dry with a clean tea towel.

For the soy seasoning, combine all the ingredients in a small bowl.

Remove the sheet pan from the oven and push the vegetables to the side. Add the noodles, corn and asparagus. Drizzle the noodles with olive oil, season with sea salt and toss well to coat. Return the tray to the oven and bake for 15-18 minutes, until the noodles are crispy on the top and bottom. You are looking for a combination of crispy and non-crispy noodles.

Remove the sheet pan from the oven, drizzle over the soy seasoning and toss well. Scatter over the scallion, cilantro and sesame seeds and serve.


* Sheet Pan Crispy Ramen Noodles With Glazed Tofu & Roasted Cabbage

Recipe is adapted slightly from Hetty McKinnon's recipe in NYTimes Cooking


Ingredients


Dried ramen noodles (at least 9 ounces) although you can use spaghetti if you can't find ramen noodles (do NOT include any flavor packets)

2 Tbsps neutral oil, such as grapeseed

Kosher salt

1 14-ounce package extra-firm tofu, pressed to remove the liquid, patted dry and cut into 1/4-inch thick slices

Half a small head of cabbage, outer leaves and core removed, thinly sliced or shredded

A handful of cilantro leaves

For the marinade

4 Tbsps hoisin sauce

1/2 cup soy sauce

2 Tbsps sesame oil

2 Tbsps maple syrup

3 garlic cloves, minced or pressed

2 tsps sesame seeds

A good-sized (2") knob of fresh ginger, peeled and finely minced or grated

A squirt of sriracha, or more to taste if you like things spicy

Directions

Preheat the oven to 450 degrees F. Bring a pot of water to a boil for the noodles.

Make the marinade by combining all the ingredients in a small bowl and mixing well.

Cook the noodles according to the package instructions then drain and toss with a splash of grapeseed or olive oil.

Dip the tofu slices in the marinade on both sides and lay them on one of the baking sheets.

Toss the sliced cabbage with salt and grapeseed oil until well-coated and lay it on the other half of the baking sheet the tofu slices are on. Put the tray in the oven and set a timer for 10 minutes.

Meanwhile, arrange the ramen noodles on the other baking sheet. When the timer goes off, check the cabbage and tofu, stirring or flipping as needed then put it back in the oven along with tray of noodles and set a timer for 10 minutes.

Check both trays and stir the noodles some to ensure that the ones on top get crispy but not burned, toss the remainder of the marinade over the noodles and bake for another 5 minutes or until the top noodles are crispy and lightly browned.

Remove trays, let cool, sprinkle with sesame seeds, chopped scallions, fresh cilantro and serve.
Pad Krapow Gai (Thai Basil Chicken)

 Ingredients

Yield: 2 to 4 servings

¼ cup vegetable oil

1 pound ground chicken (preferably dark meat)

2 teaspoons minced garlic (from 2 cloves)

2 teaspoons granulated sugar

1 teaspoon minced fresh bird’s-eye chile or other fresh chile (from 1 chile)

8 ounces green beans, trimmed and cut into ½-inch pieces (about 1½ cups)

3 tablespoons oyster sauce

2 tablespoons fish sauce

1 tablespoon Thai seasoning sauce (such as Golden Mountain; see Tip)

1 cup loosely packed basil leaves (preferably Thai basil or holy basil)

Ground white pepper, to taste

Steamed jasmine rice, for serving

4 crispy fried eggs (optional)

Heat a wok or large nonstick skillet over medium-high, then swirl in the oil. Once the oil is shimmering, add the ground chicken and cook, actively breaking the chicken up into small pieces, until it is mostly cooked, about 6 minutes.

Stir in the garlic, sugar and chile until evenly distributed and fragrant, about 2 minutes, then add the green beans, oyster sauce, fish sauce and Thai seasoning, and cook, stirring constantly, until the chicken is fully cooked, the green beans are crisp-tender and the krapow is glossy, about 2 minutes.

Remove from heat, add the basil and a dash of white pepper and toss to combine. If the sauce seems to cling too tightly to the mixture, add 1 to 2 tablespoons of water to make it loose and glossy.

Serve over rice, and top with a crispy fried egg, if desired. Serve with additional Thai seasoning to sprinkle on top, according to taste.

* Golden Mountain is made with fermented soybeans, like soy sauce, and imparts sweetness along with its jolt of salinity. It can be purchased in Asian supermarkets or online and lasts indefinitely. A dash of it adds complexity to stir-fries, curries, fried rice and cooked proteins and vegetables.


Thursday, September 8, 2022

Taiwanese pickles

 Taiwanese pickled:

1 head cabbage(best to use Taiwan cabbage), two big cucumbers,

three carrots,

Season with salt for 20mins, wash with drinking water & drained. Add sugar, and sesame oil, then add rice vinegar enough to cover all the vegetable. It'll make a large pot of refreshing and delicious pickles.

(1顆高麗菜 ,

兩條大黃瓜,

三條紅蘿蔔,

加鹽,加糖,和米醋,香油調味,做成一大罐清爽好吃的泡菜。)

Thursday, September 1, 2022

HOW TO BAKE CHICKEN BREASTS

 HOW TO BAKE CHICKEN BREASTS:

https://www.gimmesomeoven.com

Alright, so here’s the secret! To make perfectly baked chicken bbrrreasts, you simply need to follow this 5-step acronym: B.B.R.R.R.


Brine

Brush

Rub

Roast

Rest

Brine (Step 1): I’m telling you — this step is an absolute must for anytime you want to bake chicken breasts in the oven. Brining chicken is super-easy, it makes your chicken extra juicy, and best of all, it can be effectively done in just 15 minutes. Plus, if you brine chicken in lukewarm water, it also helps bring the chicken to room temperature, which makes for more even cooking. Win-win!


To brine chicken, simply fill a big bowl with lukewarm (not hot) water. Stir in a handful of salt until it mostly dissolves. Then add your chicken breasts and let them sit in the saltwater to brine for at least 15 minutes. If you are doing this in advance, you can cover and refrigerate the bowl of chicken and saltwater for up to 6 hours. But you don’t want to let the chicken brine for much longer than that.


When you’re ready to go, remove the chicken from the brine. Give it a good rinse it with cold water to wash off the salt, and then pat it dry with some paper towels. And voila — your chicken is officially brined.


Really, don’t skip over this step! It makes a world of difference.


Note: That said, some store-bought chicken breasts are now sold pre-brined. So double-check your packaging beforehand. And if your chicken has already been pre-brined in a sodium solution, just move onto step two. :)


Brush (Step 2): Brush your chicken breasts with melted butter. Or at least, I highly recommend using butter. It adds great flavor and helps give a nice golden crust on the outside. But if you’d rather use olive oil (or another favorite cooking oil), feel free.


Brush the breasts liberally on both sides to prevent the chicken from sticking to the pan, and also to help the seasonings stick. Then place the chicken breasts in a large baking dish or roasting pan.


Rub (Step 3): If you’re really wanting to keep things simple, you can simply sprinkle some salt and pepper onto the chicken breasts. But again, chicken will pick up the flavor of whatever seasonings you add. So even if you’re making a simple dish that calls for “plain” chicken breasts, I highly recommend the simple chicken seasoning recipe I have included below that includes salt, pepper, garlic powder and paprika.


Roast (Step 4): So this is the step that causes some squabbles amongst chicken lovers — how long to bake chicken breasts? And what is the correct temperature to bake chicken? Do you bake it low and slow (as in, 30 minutes at 350°F)? Or do you roast chicken high and quick (as in, 15 minutes at 450)? I have tested out both — and just about every interval in between — dozens upon dozens upon dozens of times. And in the end, I fall firmly in the latter camp when it comes to baked chicken.


I like to roast my chicken breasts on high heat.


Depending on the thickness of your chicken breasts, roasting chicken at 450°F should require a cooking time of about 15-18 minutes (depending on the thickness/size of your chicken breasts). It’s speedy and it’s easy. But mostly I love it because cooking at high heat quickly develops a nice crispier “crust” on the outside of the breasts, which also helps to lock in those juices and keep the oven roasted chicken perfectly tender on the inside. It’s the best of both worlds.


I highly recommend investing in a small cooking thermometer to measure the cooked chicken temp in order to tell if it is ready to go (the FDA says that the safe cooked chicken temp is 165°F), versus cutting into it with a fork, which lets those good juices seep out. I use this instant-read thermometer that I bought on Amazon for $10, and it will accurately measure your internal chicken temperature in seconds.


Rest (Step 5): This one is a non-negotiable. You must, must let your beautifully baked chicken breasts rest before cutting into them — a tip which applies to cooking any meat, really. If you cut in right away, you will lose all of the amazing juices and some of the tenderness that we’re going for. But if you give your freshly baked chicken breasts a brief rest, it will finish cooking and lock in all of those delicious juices, resulting in the most tender and juicy and delicious baked chicken.


I recommend loosely tenting a sheet of aluminum foil over the pan to keep the heat in while the chicken rests. And then after 5-10 minutes, you can finally serve and enjoy your perfectly-cooked chicken breasts.

Hawaiian Chicken Kebabs

 Hawaiian Chicken Kebabs 

https://www.cookingclassy.com

Ingredients

Marinade:

1/3 cup ketchup

1/3 cup packed dark brown sugar

1/3 cup low-sodium soy sauce

1/4 cup canned pineapple juice

4 Tbsp olive oil , divided, plus more for brushing grill

1 1/2 Tbsp rice vinegar

4 garlic cloves , minced (4 tsp)

1 Tbsp minced ginger

1/2 tsp sesame oil

Salt and freshly ground black pepper

Kebabs:

1 3/4 lb boneless, skinless chicken breast , chopped into 1 1/4-inch cubes

3 cups (heaping) fresh cubed pineapple (about 3/4 of 3 lb pineapple)

1 1/2 large green peppers , diced into 1 1/4-inch pieces

1 large red onion , diced into 1 1/4-inch pieces

Instructions

In a mixing bowl whisk together ketchup, brown sugar, soy sauce, pineapple juice, 2 Tbsp olive oil, rice vinegar, garlic, ginger and sesame oil. Stir in 3/4 tsp pepper and season with salt if desired.

 Place chicken in a gallon size resealable bag. Reserve 1/2 cup of the marinade in refrigerator then pour remaining marinade over chicken. Seal bag and refrigerate 1 hour (meanwhile soak 10 wooden skewer sticks in water for 1 hour).

Preheat a grill over medium heat to 400°F (200°C). Meanwhile, drizzle remaining 2 Tbsp olive oil over red onion, bell pepper and pineapple and toss. Season red onion and bell pepper with salt and pepper, then thread red onion, bell pepper, pineapple and chicken onto skewers until all of the chicken has been used. 

Brush grill grates with olive oil then place skewers on grill. Grill 5 minutes then brush along tops with 1/4 cup of remaining marinade. Rotate to opposite side and brush remaining 1/4 cup of marinade on opposite side. 

Allow to grill about 4 minutes longer, or until chicken registers 165°F (75°C) in center on an instant read thermometer. Serve warm.

Notes

If using wooden skewers, make sure to soak them in cold water for at least 1 hour before using so they don't burn while cooking.

For best results, don't use canned pineapple in place of fresh. The flavor isn't near as good and the canned cubes aren't very large.

Can I Bake Chicken Kebabs Instead of Grilling?
Some readers have mentioned they’ve had success baking these chicken pineapple kebabs as well (I haven’t yet tried myself because I love this grilled version). 400 degrees F on a well greased baking sheet about 15 – 20 minutes, rotating occasionally.


How to Make Hawaiian Chicken Kebabs
Stir together marinade ingredients: in a mixing bowl whisk together ketchup, brown sugar, soy sauce, pineapple juice, 2 Tbsp olive oil, rice vinegar, garlic, ginger and sesame oil. Season with salt and pepper.
Add marinade to chicken, rest: place chicken in a gallon size resealable bag. Reserve 1/2 cup of the chicken kebab marinade in refrigerator, then pour remaining marinade over chicken. Seal bag and refrigerate 1 hour.
Preheat a grill over medium heat to 400°F (200°C).
Toss fruit and veggies with oil and season: drizzle 2 Tbsp olive oil over red onion, bell pepper and pineapple and toss, season with salt and pepper.
Thread ingredients onto skewers: thread red onion, bell pepper, pineapple and chicken onto skewers until all of the chicken has been used.
Cook through on grill: grill chicken on oiled grill grates 5 minutes then brush along tops with 1/4 cup of remaining marinade. Rotate to opposite side and brush remaining 1/4 cup of marinade on opposite side.
Allow to grill about 4 minutes longer, or until chicken registers 165°F (75°C) in center on an instant read thermometer.

Tips for the Best Chicken Kebabs
If using wooden skewers, make sure to soak them in cold water for at least 1 hour before using so they don’t burn while cooking.
For best results, don’t use canned pineapple in place of fresh. The flavor isn’t near as good and the canned cubes aren’t very large.
Don’t forget to baste the chicken skewers while grilling so they don’t dry out. This will also add extra flavor.


Kenji's Halal cart-style chicken w/ rice and white sauce

  Kenji's Halal cart-style chicken Ingredients For the chicken: 2 tablespoons fresh lemon juice 1 tablespoon chopped fresh oregano 1/2 t...