Friday, January 29, 2021

Red Bean Pudding 肥媽紅豆糕

Red Bean Pudding 

Ingredients:

Coconut milk   -   200g 

Evaporated milk   -   100g

Cooked red bean   -   a bowl (or canned red bean) 

Water   -   200g

Corn starch   -   120g

Sugar   -   140g  

Methods: 

1. In a mixing bowl, add in corn starch, water, and mix well.  Add in evaporated milk, coconut milk, mix well and pour into a cooking pot. 

2. Add in sugar and continue stirring on LOW heat.  Add in red bean and keep stirring until the batter thickens and tiny bubbles appear.  

3. Transfer to tray/mold.  Refrigerate to set.


《肥媽紅豆糕》

材料:
📌椰奶 200g Coconut Milk
📌砂糖 140g Sugar
📌粟粉 120g Corn Starch
📌紅豆 100g Red Bean *可用罐裝或自己煮
📌水 200g Water
📌淡奶 100g Evaporated Milk

做法:

1. 先用水開了粟粉攪勻再加入椰奶及淡奶攪勻
2. 將 #1 的粉漿混合物倒入預熱的煲中用慢火一邊攪拌一邊加入砂糖(亦可先用水煮溶砂糖然後再加粉漿煮)注意⚠️不要太猛火因粟粉會容易凝固. 用手一直攪拌不能停下.
3. 可試下味調教一下自己喜愛的甜度
4. 一直攪拌至差不多成型馬上放入紅豆,繼續攪拌至粉漿起小泡煮熟變稠
5. 趁熱倒入盛器或模具及掃平
6. 稍為放涼後冷藏, 完成


Tuesday, January 26, 2021

DL book from sis

 http://gen.lib.rus.ec


Tea Eggs

Tea Eggs (Wesley Chaplin)

I think the instructions are from Woks of Life but I modified the ingredient list to match my Wai Po's recipe. She wasn't a huge fan of everything in five spice, so she put in just peppercorns and star anise. The cooking wine/shaoxing wine adds a nice layer of flavor too, as do the bay leaves. And I do prefer the soft boiled version. It's like impossible to get the beautiful marbling though so I just completely peel them and let them soak 24 hours, but I usually can't resist and have one in the morning... haha.

• 4 tablespoons light soy sauce (or soy sauce)

• 2 tablespoons dark mushroom soy sauce (or soy sauce)

• 2 bay leaves

• 1 tablespoon Sichuan peppercorns

• 3 star anise

• 2 teaspoons sugar

• 1 teaspoon salt

• 3 tablespoons cooking wine

• 2 black tea bags (or 2 tablespoons black tea leaves)

• 2 cups water

• ½ cup ice cubes

Instructions

1. Mix all the marinade ingredients in a small pot. Cook over medium heat until bringing to a boil. Turn to medium-low heat. Simmer for 10 minutes. Remove the pot from your stove and let cool completely. Once done, remove and discard the tea bags.

2. To boil the eggs, heat a pot of water (enough to cover all the eggs) over high heat until boiling. Turn to low heat. Carefully place the eggs in the pot using a ladle, to prevent the eggs from cracking.

3. Boil 5 minutes for soft-boiled eggs, 7 minutes for medium eggs, or 10 minutes for hard-boiled eggs.

4. While cooking the eggs, prepare an ice bath by combining ice and tap water in a big bowl.

5. Once the eggs are cooked, immediately transfer them to the ice bath to cool for 2 to 3 minutes. If you don’t have ice on hand, simply run cool tap water over the eggs for a couple minutes until they cool down.

6. Gently crack the eggs using the back of a spoon. You want to make sure the egg shells are cracked enough so the marinade will reach the interior, without cracking the eggs apart (especially if you made soft boiled eggs). If you’re in a hurry, you can also peel the eggs and marinate them peeled. The eggs will be ready in 12 hours this way.

7. Transfer the eggs to a quart-size ziplock bag, then carefully pour in the marinade along with the dry ingredients. Marinate overnight for peeled eggs, or 24 hours for cracked “marble” eggs.

8. Peel the eggs and enjoy them cold or at room temperature!

9. You can store the leftover eggs in the marinade for 4 to 5 days in the fridge. The marinade will help with preserving the eggs. Note, the eggs will become more flavorful and saltier over time.


Garlic noodles

Garlic Butter Shrimp over a bed of Garlic Noodles  (Sarah Nhi To)

Garlic Noodles:
-boil thin spaghetti noodles or whatever noodles you’d like
-rinse in cold water and toss noodles in olive oil to keep from sticking
-in a big sauce pan: melt butter and garlic together (the more the merrier) 
- In a bowl: mix equal parts oyster sauce and soy sauce, add sugar, garlic salt, sesame oil, and black pepper. Shouldn’t be too salty. 
- Throw in sauce mixture with the butter and garlic and mix until sauce boils and toss in noodles and mix well
- Add Parmesan cheese to liking and that’s that! 

Garlic Butter Shrimp: 
- I marinated my shrimp in fresh garlic, parsley flakes, black pepper, garlic salt, chili powder, lemon pepper, and sesame oil. Then I sautéed the shrimp with oil and once the shrimp is almost done cooking , add butter and mix until thickens and done!

Saturday, January 23, 2021

Chocolate Mochi Brownies by Kaori Becker's cookbook, "Mochi Magic"

An excellent introduction to the world of baked mochi treats, these mochi brownies adapted from Kaori Becker’s “Mochi Magic” (Storey Publishing) come together as easily as conventional cocoa brownies. The results are crispy on the edges and gooey-chewy in the middle. They’re also excellent served still warm from the oven with vanilla ice cream.


Butter or neutral cooking oil for greasing pan
3 cups mochiko (sweet rice flour)
½ cup unsweetened cocoa powder
1 tablespoon baking powder
½ teaspoon salt
2 large eggs
2 cups packed light brown sugar
2½ cups whole milk
½ cup vegetable oil
½ cup melted butter
2 teaspoons pure vanilla extract
1 cup semisweet chocolate chips

Preheat the oven to 350 degrees. Grease a 9-by-13-inch baking pan.

Sift together the mochiko, cocoa, baking powder and salt in a large bowl.
Beat the eggs in another large bowl. Stir in the sugar, milk, oil, butter and vanilla. Mix well. 

Scrape this mixture into the bowl with the mochiko mixture and whisk until uniform in texture (make sure there are no lumps). Stir in ½ cup of the chocolate chips.

Pour the batter into the prepared pan, then scatter the remaining ½ cup chocolate chips on top.

Bake for 50 to 60 minutes, until golden brown. Let cool to room temperature. Cut into squares and store in an airtight container at room temperature for 2 days, or in the freezer for up to 1 month.

Mochi matcha pancake

Mix the following well in a large bowl:
2 eggs
1/3 cup whole milk
2 tbsp whole yogurt
1 tbsp sugar
1 tbsp honey

Mix the following in a separate bowl and then sift into the wet ingredients:
1 cup mochiko
1 tsp baking powder
1.5 tsp matcha powder

Melt 3 tbsp of butter and stir it into the batter. Mix well. Cook on medium low heat.

Tuesday, January 19, 2021

Tomato and Egg Stir Fry 蕃茄炒蛋 肥媽 Maria Cordero

 蕃茄炒蛋


📌鷄蛋4隻
📌鹽少許
📌番茄2個 - 連皮對半切再每邊切開三塊(可隨意去皮)
📌茄汁2湯匙
📌糖 3茶匙
📌蔥 2茶匙 切條和拿一些切粒
📌水少許
注意⚠️煮之前要先將碟, 糖, 鹽, 茄汁及水凖備好放側邊備用
步驟:
1. 先將雞蛋打勻並放入少許鹽
2. 燒熱個鑊加油(可加多小小油), 加入雞蛋後用鑊鏟炒幾下, 馬上拿出來上碟 備用⚠️千萬不要煮熟
3. 倒些油入鑊內, 加入蕃茄再加糖, 鹽和茄汁, 再加少許水煮和炒幾下. 此時可加蔥炒下 , 但不要煮得太熟
4. 待蕃茄滾起時, 倒入雞蛋不要動侍它滾後便可上碟, 再灑上蔥粒, 完成.

Classic Tomato and Egg Stir Fry
(YouTube video starts at 14:35.)
Ingredients:
Eggs - 4 or more
Tomato - 2 (cut into chunks. Optional to remove skin.)
Seasoning ingredients:
Salt - 2 tsp
Sugar - 2 tsp
Ketchup - 2 tbsp
Water - a bit to make the sauce
Green onion - cut into chunks
White pepper - optional
Methods:
1. In a bowl, beat eggs, add a pinch of salt and mix well. Set aside.
2. Heat up a wok, add more oil than usual. Add in beaten eggs and stir fry for a FEW SECONDS and transfer to a plate. DO NOT fully cook the eggs for now.
3. In the same wok, add in tomato chunks, sugar, salt, ketchup, water, and mix well. Add in green onion chunks and cook until tomato chunks are soft but still chewable but NOT mushy.
4. Bring the wok to a boil.
5. Return partially cooked eggs back to the work. DO NOT touch them. Let it boil a bit.
6. Transfer to a serving plate. Garnish with more green onion pieces.

Stuffed Pork Tenderloin with Cheese 肥媽 Maria Cordero

 流心芝士豬柳卷

材料
📌 豬柳1條
📌 蒜鹽少許
📌 白胡椒少許
📌 芝士碎適量
📌 蛋漿2隻
📌 麵粉適量
📌 麵包糠適量
做法
1. 豬柳洗淨切開一件件,之後用槌子或刀背拍平豬柳,成為一塊塊薄片。
2. 先用蒜鹽把豬柳片前後醃勻,再用白胡椒前後醃勻。
3. 豬柳片平放,之後放上一團芝士碎,再把豬柳片捲成橢圓卷狀。
4. 一碗準備蛋漿,一碟準備麵粉,另一碟準備麵包糠,豬柳卷先拍上麵粉,再沾上蛋漿,最後拍上麵包糠,放置一邊,直至完成所有豬柳卷。
5. 準備氣炸鍋,把豬柳卷噴上油,逐個逐個鋪在氣炸鍋內。
6. 以200度焗15分鐘,之後取出,上碟,即成。

肥媽 Maria Cordero
YouTube Live – January 15, 2021 Recipe English Version
Deep-Fried Stuffed Pork Tenderloin with Cheese
(YouTube video starts at 2:40.)
Ingredients:
Pork tenderloin - (slice into round thick pieces and pound flat with a meat mallet or the back of a cleaver and flatten it more with the side of the cleaver.)
Marinate ingredients:
Garlic-salt - to taste but not too much because the cheese is salty.
White pepper - to taste
Filling ingredient:
Cheese - of your choice (or replace with asparagus or blanched long beans or assorted mushrooms or blanched spinach if you do not like cheese)
Coating ingredients:
Flour - a plate full
Eggs - 2 whole eggs (mix well and put in bowl)
Bread crumbs - a plate full
Methods:
1. Marinate flatten pork tenderloin pieces with garlic salt and white pepper on both sides.
2. Fill the flattened pork tenderloin pieces with cheese and roll and mold into shape to secure the cheese.
3. Coat stuffed pork tenderloin pieces with a thin layer of flour. Tap off excess flour.
4. Dip coated stuffed pork tenderloin pieces into eggs.
5. Coat with bread crumbs.
6. Spray a coat of oil over each pork tenderloin for a crispier texture.
7. Put them in the air fryer at 200C (392F) for 10 minutes then flip them over and air fry them for a further 5 to 7 minutes or you can deep fry them in a wok on a stovetop.


Thursday, January 7, 2021

Chicken Biyrani - Weekofmenus

Copy From WeekofMenus website

Project Food Blog Challenge #2: Ready to tackle a classic dish from another culture? Pick an ethnic classic that is outside your comfort zone or are not as familiar with. You should include how you arrived at this decision in your post. Do your research then try to pull off successfully creating this challenge. Try to keep the dish as authentic as the real deal, and document your experience through a compelling post. 


I really love Indian food.  I think I've loved it since elementary school, when I went over to friend AK's house for a birthday party and her mom served us tandoori chicken with naan bread.  That was probably my first exposure to Indian food and I loved it that first time.  In high school and college, friend PJ's mom would make tons of delicious Indian food and I would get to partake, by virtue of being PJ's friend and roommate.

After college, I no longer had opportunity to eat homemade Indian food and it wasn't until moving to Hong Kong that I started my love affair with it again.  However, I had severe and dangerous allergic reactions while eating it and couldn't figure out why, until I made the discovery that I was highly allergic to cashew nuts.  A lot of Indian dishes use ground up cashew nuts as a thickener and a rich base and the nuts continually caused me problems when eating Indian food out.  Even when carefully asking the restaurant which dishes had cashews, I repeatedly had problems.  Husband then made the decision for me; there was NO MORE Indian food, as each incident meant that I was rushed to the emergency room, windpipe closing up, face swelling up and a variety of rather unpleasant reactions.

Around the same time of discovering this cashew allergy, I started becoming friends with GWK.  She was Indian, born and raised, living in Hong Kong, an expat much like I was.  We quickly became fast friends as we realized that we had much in common, our love for hikes up the mountain, our appreciation for nature within the hustle and bustle of the city, and our enjoyment of good food.  Our husbands were already friends so our friendship was the icing on the cake for them.

GWK would often ask me to eat at her house after our hikes through the hills of Hong Kong (yes there are beautiful verdant hills in Hong Kong) and I would politely refuse.  I didn't want to tell her why, so I would make excuses, such as I had eaten too much before, or I was dieting, or I just wasn't hungry.  Each time she would look a little bit sad, as I was refusing her food, so I finally had to tell her my allergy to cashews.  She nodded solemnly when I explained and then she said, "I will cook you Indian food WITHOUT cashews."

She fed me and our friendship blossomed.  I'd like to say that it was our strong relationship that allowed us to become fast close friends, but I have to admit that the way to my heart is through my stomach.  The food, the excellent food, definitely did not hurt the friendship.  GWK's incredible generous heart did not hurt the friendship.  Her ability to make me food often and her desire to feed me often did not hurt the friendship.  Lest you think I just took from this relationship, I also cooked for her in return plenty.  (She was, in particular, partial to my brownies.)

This dish is my favorite of the dishes that she cooked.  Often her husband VK and she would invite Husband and me over, and we'd eat plates of this dish, one after the other.  VK would often tease me that the amount of food I put away would feed an elephant, and warn me not to sit on the more "fragile" pieces of furniture in his house, but I didn't care.  The biriyani, with all of its spices, richness and fantastic colors was simply too good to pass up.  At VK and VWK's biriyani parties, I would be the first one at the dish, scooping out the amazingly fragrant rice and the last person still eating.

But since leaving Hong Kong, and parting from my dear friend, I've not had it, as Indian food is once again off limits.  Without someone purposefully caring about me and my allergy when cooking Indian dishes, I cannot eat it.  I have lived without for seven years, dying for a fix of Indian food.  However, when the Project Food Blog challenge came up, asking for a classic dish from another culture, I decided that I would take my blog to India. I emailed GWK, asked for the recipe, and she so generously obliged, making notes for me from her head as she makes the biriyani mostly without measuring.    To answer my questions about certain techniques, she called me all the way from Bombay to help me out.  This is her dish, from her kitchen to mine.  In it, I taste our laughter, our pleasure in each other's company, and our years of friendship.  GWK, I miss you so much and you know it's not just because of the food, because I can now make Chicken Biriyani on my own. 

Before making this dish, I had always assumed that making Indian food was super complicated.  However, beyond the gathering of a long list of spices and having them ready, there is nothing in here that difficult.  This dish about making a flavorful chicken, and layering it with rice and saffron milk.  It's similar to the idea of a lasagne, different components layered together to make one uniform dish.  If you're not sure about making the layered rice biriyani, definitely make the chicken and serve it with naan or rice as it is excellent just on its own.  It is a fun dish to take you out of your comfort zone, and I assure you is worth experimenting and trying once.

**Preparation note: I bought most of my spices at a local Indian store in my neighborhood.  The spices are available at a good supermarket, although the prices at the Indian store are far cheaper.

**Preparation note: Use time wisely.  As the list of ingredients is very long, before cooking, take time setting up and gathering up all your ingredients. 
Chicken Biriyani
Serves 6-8

2 1/4 lbs of skinless, boneless chicken thighs
1 cup of yogurt
1 teaspoon salt

1/4 cup of milk
3 saffron threads

3 tablespoons vegetable oil
1 onion, thinly sliced

3 cups of basmati rice

3 tablespoons vegetable oil
5 whole black peppercorns
4 cardamom pods
2 cinnamon sticks
2 whole cloves
1 bay leaf
1 star anise
3 onions, chopped finely
1 green chili, chopped finely (I used a serrano chili)
1 tablespoon of fresh ginger, finely chopped
1 tablespoon of finely chopped garlic
28 oz can of pureed tomatoes
4 teaspoons coriander powder
2 teaspoon cumin powder
1 teaspoon cayenne pepper
1/2 teaspoon turmeric powder
1 teaspoon salt
1 cup of yogurt, mixed with a spoon
1 1/2 cups finely chopped cilantro leaves
1/2 cup finely chopped mint leaves


Directions

Preparation of components
Cut chicken thighs into nice big chunks (Each thigh became about 6 pieces.) . Mix yogurt and salt together. Add chicken to yogurt. Refrigerate and set aside for a few hours.

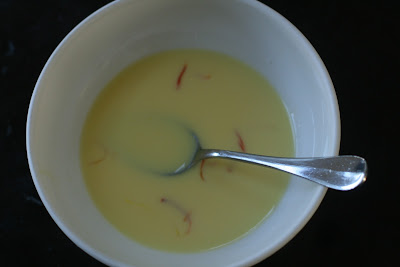
Mix milk and saffron together. Set aside, allowing the saffron to turn the milk a lovely yellow color.

In a non stick pan, heat 3 tablespoons of vegetable oil over high heat. Fry onions until crispy and golden. Remove from oil and drain on a paper towel. Set aside until needed.


Cook rice according to package directions. (I cooked mine in my rice cooker, 3 cups of rinsed rice to 5 1/4 water)

Preparation of chicken
Heat oil over high heat in a non stick pan. Add the peppercorns, cardamon pods, cloves, cinnamon sticks, bay leaf, and star anise. Let them crackle and change color, about 1 minute.


Add onions and brown them, about 6 minutes.

Add ginger, garlic, green chili and chicken. Stir then shut the lid so that the chicken absorbs the flavors. Reduce heat to low and cook until the chicken lets out its juices, about 10 minutes.

Open the lid, increase heat to medium and reduce the liquid by half, stirring occasionally, about 15 minutes. The chicken will become a darker richer brown.

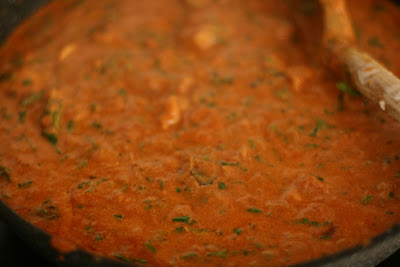
Add the tomato puree, coriander powder, cumin, cayenne, turmeric and salt. Continue stirring on high heat so that the chicken gets cooked with the tomatoes and spices, about 5 minutes. Add yogurt and stir. The chicken gets a creamy sauce. Add the chopped coriander and mint leaves.

Assembly
Layer the chunks of chicken with a bit of the sauce and cooked rice alternatively. (You may have leftover sauce as I did. That's okay. It tastes fantastic with plain rice.)

Drizzle saffron milk over the rice to garnish and top with fried sliced onions.

Pressure Cooker Shrimp Biryani

 The key to cooking shrimp biryani in an electric pressure cooker is to buy jumbo shrimp, which won’t overcook in the amount of time it takes to cook the rice. This version, from Chandra Ram’s “The Complete Indian Instant Pot Cookbook,” is bright with ginger root, fresh curry leaves and plenty of lime juice. Kashmiri chile is a very mild red chile powder that can be found in Indian markets, but if you can’t get it, substitute three parts sweet paprika and one part cayenne. And if you can’t get the fresh curry leaves, simply leave them out. The dish won’t be quite as fragrant, but will still be delicious. —Melissa Clark

INGREDIENTS

2 cups basmati rice

2 teaspoons vegetable oil

1 onion, chopped

1 Serrano chile, minced

2 tablespoons minced fresh ginger

1 tablespoon minced garlic

2 teaspoons kosher salt

1 teaspoon Kashmiri chile powder

1 teaspoon ground turmeric

1 teaspoon smoked paprika

10 fresh curry leaves, torn into pieces

1 ½ cups boiling water

1 ½ pounds jumbo shrimp (16 to 20 or fewer per pound, see note), peeled and deveined

1 (15-ounce) can diced tomatoes, with juice

2 teaspoons freshly squeezed lime juice, plus more wedges for serving

½ cup chopped fresh cilantro

PREPARATION

Place the rice in a bowl and cover with 2 cups water. Let stand for 20 minutes, then drain and rinse.

Heat oil in the pot of an electric pressure cooker with the sauté function set on high, until oil is shimmering. Add onion; cook for about 4 minutes, until softened. Stir in Serrano chile, ginger, garlic, salt, chile powder, turmeric, paprika and curry leaves; cook for about 1 minute, until fragrant.

Stir in boiling water; using a wooden spoon, stir, scraping up any browned bits on the bottom of the pot. Stir in soaked rice, shrimp and tomatoes (with juice).

Secure the lid and cook on high pressure for 3 minutes. Quick-release the pressure, stir lime juice into the rice, then cover the pressure cooker with a kitchen towel and let it sit for 5 minutes.

Give rice a stir, then taste and add more salt, if needed. Transfer to a platter, garnish with cilantro and serve with lime wedges on the side.

Tip

Make sure to use jumbo shrimp or larger for this recipe. Look for “16/20” or “U/15” on the package; this indicates how many shrimp there are per pound.


Shrimp Creole

 Much like gumbo, this shrimp and tomato stew starts with a roux that thickens and adds a distinct flavor (though many takes on shrimp Creole skip the roux altogether). Next, the “holy trinity” of Creole cooking — onion, celery and bell pepper — is simmered in the roux. You’ll want to stir the bottom of the pot constantly to prevent the roux from sticking and burning, and make sure to keep a close eye: A burned roux can’t be saved. Creole cuisine relishes improvisation, so feel free to add other veggies or a different protein, or omit the hot sauce and add a teaspoon of apple cider vinegar in its place. This spicy stew is traditionally served over steamed white rice, but is also delicious served over brown rice or other whole grains, like quinoa.

FOR THE CREOLE SEASONING (OPTIONAL):

1 tablespoon smoked paprika

1 tablespoon chili powder

1 teaspoon onion powder

1 teaspoon garlic powder

½ teaspoon cayenne pepper (or less, if desired)

½ teaspoon fine sea salt

½ teaspoon black pepper

FOR THE SHRIMP:

1 pound shrimp, peeled and deveined

2 teaspoons homemade or store-bought Creole seasoning

¼ cup unsalted butter (1/2 stick)

⅓ cup all-purpose flour

1 medium yellow onion, finely chopped

2 celery ribs, thinly sliced

1 green bell pepper, seeded and finely chopped

4 garlic cloves, minced

1 (15-ounce) can tomato sauce (no salt added)

1 to 2 teaspoons hot sauce, to taste (optional)

1 teaspoon granulated sugar

½ teaspoon dried thyme

½ teaspoon dried oregano

½ teaspoon dried basil

2 dried bay leaves

 Fine sea salt and black pepper

¼ cup chopped scallions

¼ cup chopped flat-leaf parsley leaves and tender stems

 Steamed rice, for serving

PREPARATION

Make the optional Creole seasoning: Combine all ingredients in a small bowl and stir together. The seasoning makes about 1/4 cup; store it in a closed container in a cool, dry place. 

Toss the raw shrimp with 1 teaspoon Creole seasoning and set aside.

In a Dutch oven or large, heavy skillet, melt the butter over medium-low heat. Sprinkle the flour on top and stir constantly with a wooden spoon until a roux the color of peanut butter forms, about 10 minutes.

Add the onion, celery and bell pepper, increase the heat to medium and cook until softened, stirring occasionally, about 8 minutes. Stir in the garlic and cook until fragrant, 1 minute.

Stir in 1/3 cup water, then the tomato sauce, hot sauce (if using), sugar, thyme, oregano, basil, bay leaves, 1 1/2 teaspoons salt, 1/2 teaspoon black pepper and the remaining 1 teaspoon Creole seasoning. Bring to a simmer, then reduce the heat to low. Cover and simmer for 10 minutes until thickened, stirring occasionally to make sure that the bottom doesn’t burn. (If needed, add more water.) 

Once the stew has thickened, add the seasoned shrimp and simmer until opaque and cooked through, about 5 minutes, turning each piece halfway through the cooking time. Taste and adjust seasoning.

Remove from the heat and let stand for 10 minutes, uncovered. Sprinkle with scallions and parsley, and serve over steamed rice.


HOMEMADE UDON NOODLES AND MISO SOUP (chef Tak Sekin)

 Udon

– 200g wheat flour

– 80g water

– 2 pinch of salt

Mix everything and knead very hard for at least 30 min. Clean film to leave for 1h. Knead again for another 15 min. Spread, cut, cook in water for about 12 min. (You can use a pasta machine if you have one, I found it quite simple to do this with the roller!)

Soy marinated boiled eggs

1 cup of water

1/2 cup soy sauce

2 tbsp brown sugar

2 tbsp rice vinegar

1. Cook 2 eggs in boiling water for 6 minutes. Place in cold water.

2. Mix water, soy, sugar and vinegar. Leave the eggs without their shell to marinate in this mixture for at least 1 hour.


Dashi

For the broth, the ideal is to prepare a dashi, the Japanese broth which is used as a base for the miso soup. You can use it dehydrated or make it yourself. For 1.5 liters of water, you will need:

– 50 g katsuobushi (dried bonito)

– 30 g of Konbu seaweed

Dip the piece of konbu in cold water. Heat and keep on low heat for 1 hour. Then add the bonito flakes, then filter the whole.


Miso soup (for 2)

Don’t panic, if you can’t find these kinds of ingredients, you can also make a miso soup without the dashi, like me. This following recipe is not traditional, I completely improvised it but it was delicious

– large piece of fresh ginger

– 1 or 2 cloves of garlic

– 1 pinch of chili

– 1 pinch of coarse salt

– 1 sachet of Ariake broth (they are really delicious and completely natural)

– 2 tbsp miso paste

– 1/2 leek or spring onion

– 2 pieces of roasted pork

1. Brown a large piece of grated ginger with garlic in a saucepan with chili. Cover with water and put the sachet of broth in it.

2. Add the miso paste, salt, simmer for about 15 minutes.

3. Place the udon in the broth for about 12 minutes.

4. Serve the broth with the udon, add the roast pork, finely chopped leek or spring onion, marinated egg cut in half.


Wednesday, January 6, 2021

Shanghai Stir-Fried Chunky Noodles 上海粗炒麵

 This Shanghainese noodle recipe, from the British cook and food writer Fuchsia Dunlop, can be made vegetarian by omitting the pork. Do seek out light and dark soy sauces; light soy sauce adds salty-umami flavor and dark soy sauce adds color.

Traditional woks are made from carbon steel, and must be routinely seasoned to keep from rusting. To season, heat the wok on high, turn off the flame and use a paper towel to wipe the interior with vegetable oil. Repeat if necessary. A deep frying pan with high sides will work for this recipe if you don't have a wok. 


INGREDIENTS

6 ounces lean pork, from a boneless pork loin chop or a tenderloin

½ teaspoon plus 2 tablespoons light soy sauce

1 ½ teaspoons Shaoxing wine

1 teaspoon cornstarch

1 pound fresh Shanghai noodles or Japanese udon noodles

2 tablespoons peanut or vegetable oil, plus a splash

1 tablespoon dark soy sauce

2 tablespoons chicken stock

10 ounces green baby bok choy or 2 large handfuls of baby spinach

 Salt and ground white pepper


Cut the pork evenly into 1/4-inch slices, then into 1/8-inch slivers.

In a small bowl, combine 1/2 teaspoon light soy sauce, the Shaoxing wine, the cornstarch and 1 tablespoon cold water and mix well. Add pork and marinate until ready to cook.

Bring a large, deep pot of water to a boil. Add noodles and cook for 2 minutes. Turn the cooked noodles into a colander and rinse with cold water. Shake them dry and toss with a splash of oil, stirring thoroughly to prevent sticking.

In a small bowl, combine remaining light soy sauce, the dark soy sauce and the chicken stock and set aside. Heat 1 tablespoon oil in a large, seasoned wok over high heat until oil just begins to smoke. Add pork, leaving the marinade behind, and stir-fry swiftly to separate. When they are just cooked, remove from wok and set aside.

Clean and re-season the wok, if necessary, then return it to high heat with the remaining oil. Add noodles and soy sauce mixture and stir-fry until piping hot. Add bok choy or spinach and continue to stir-fry briefly until wilted. Stir in the pork and season to taste with salt and white pepper. Serve.


Kenji's Halal cart-style chicken w/ rice and white sauce

  Kenji's Halal cart-style chicken Ingredients For the chicken: 2 tablespoons fresh lemon juice 1 tablespoon chopped fresh oregano 1/2 t...